How Hard Water Can Wreck Your Plumbing (And How to Stop It)

hard water solutions

How Hard Water Can Wreck Your Plumbing (And How to Stop It)

No one likes unexpected plumbing problems, especially when the culprit is invisible to the naked eye. For many homes, hard water is the culprit behind clogged pipes, low water pressure, and even damaged appliances, silently causing significant damage over time.

If you’re unsure what hard water is and why it matters, this post will break it down for you—and share some hard water solutions that can save your plumbing (and your wallet).

What Is Hard Water?

Hard water refers to water that contains high levels of dissolved minerals, primarily calcium and magnesium. While these minerals are generally safe to consume, they can wreak havoc on your home’s plumbing over time. 

Water hardness is generally measured in grains per gallon (GPG). Water with over 7 GPG is considered hard, while anything below is soft; in some areas, hardness can reach 30 GPG, requiring stronger hard water solutions. According to the U.S. Geological Survey, 85% of homes in the United States have hard water to some degree. That means there’s a good chance your home could be affected too.

Signs That You Have Hard Water

Before the long-term damage sets in, hard water often leaves behind tell-tale signs that are easy to spot. Here are some of the most common indicators:

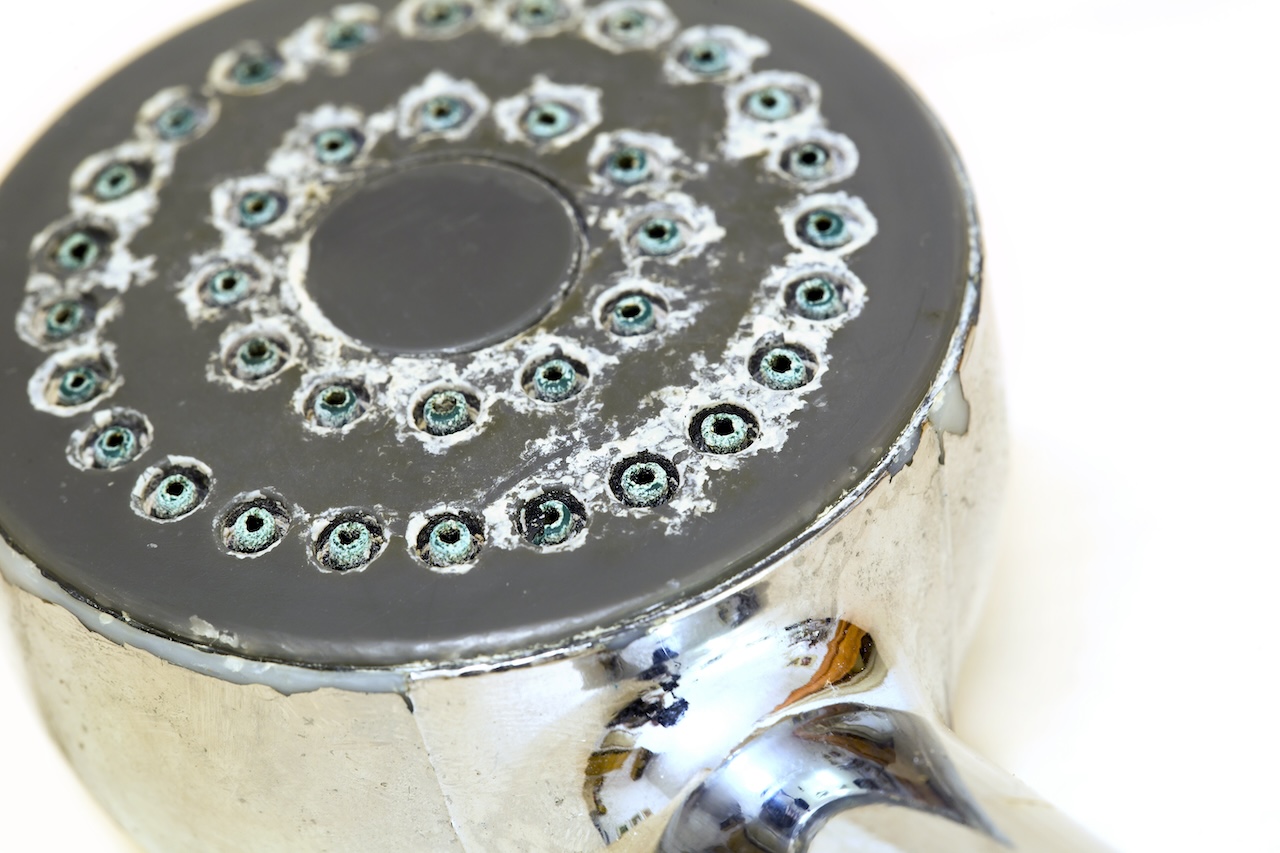
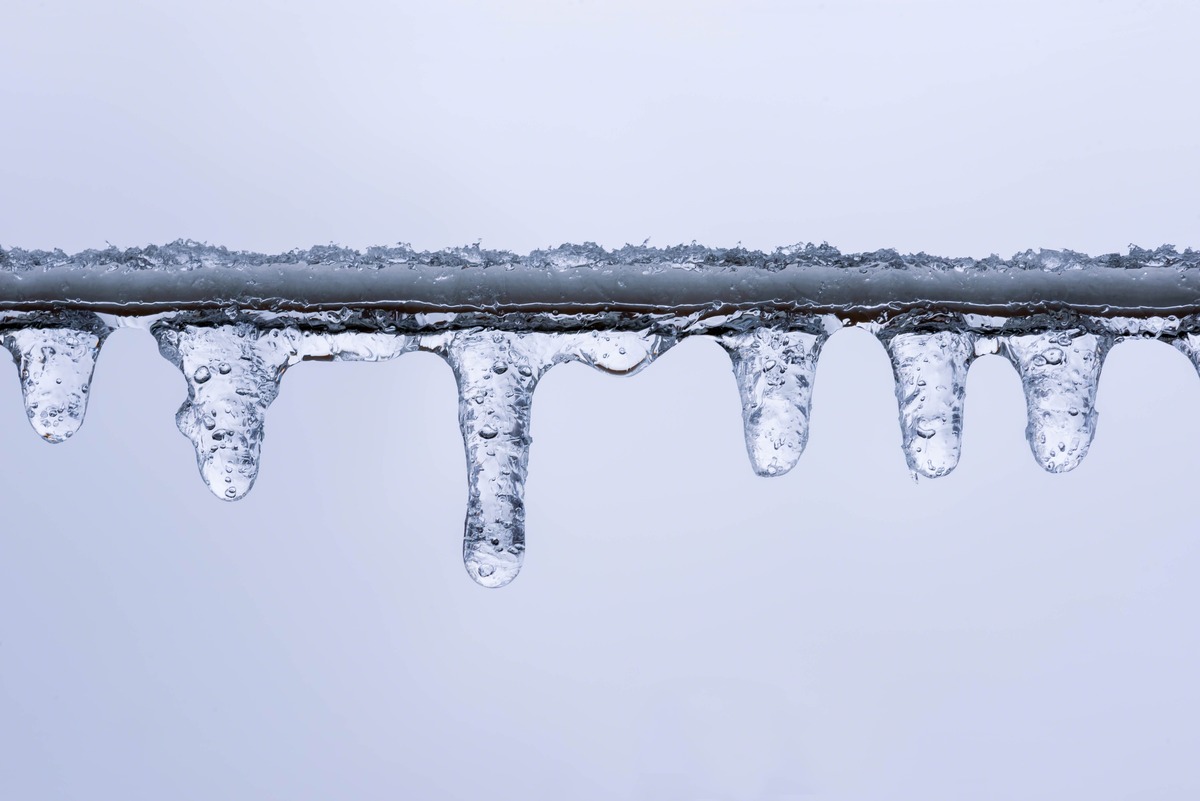
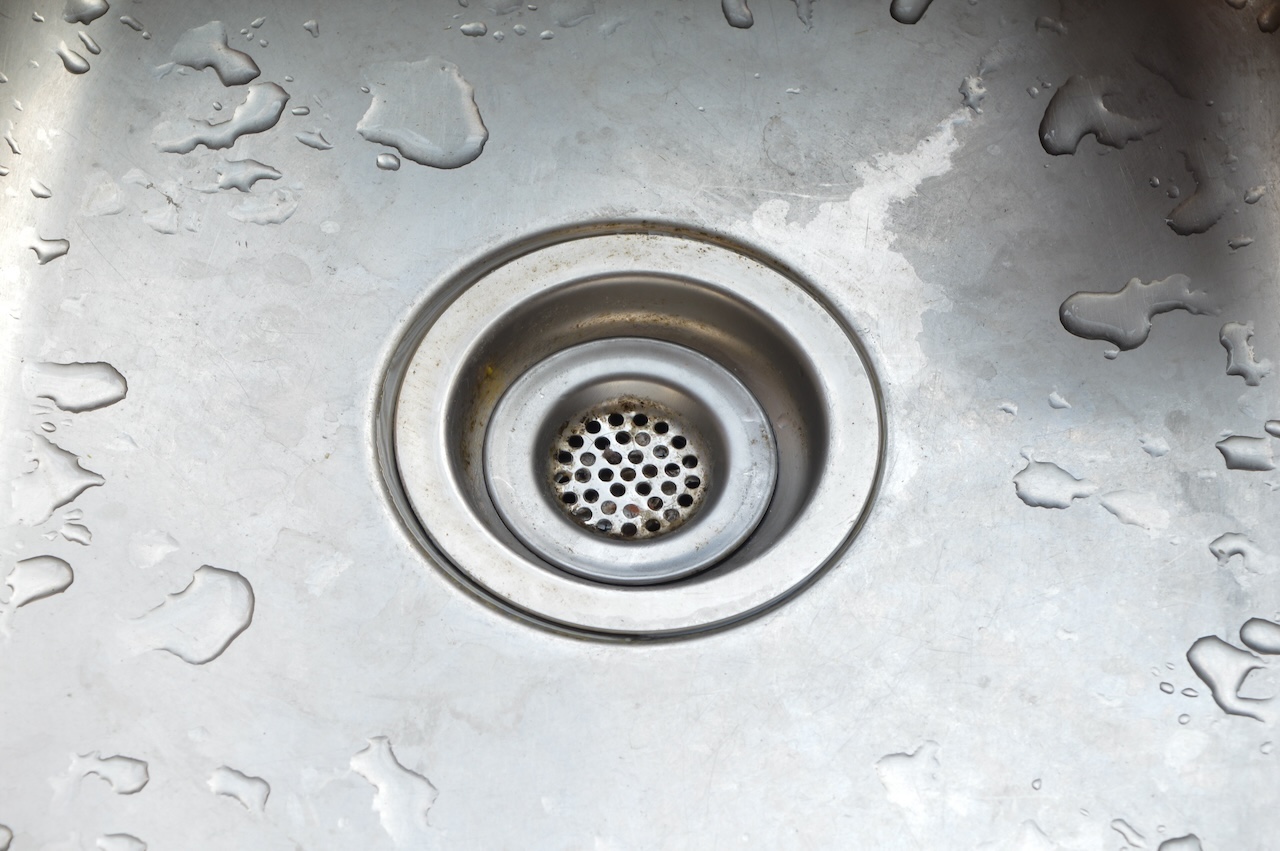
  • White, chalky buildup on faucets or shower heads (this is known as limescale). 
  • Spots or streaks on glasses and dishes despite washing them thoroughly. 
  • Low water pressure caused by mineral deposits clogging pipes or shower heads. 
  • Dry skin and brittle hair after showers. 
  • Faded, stiff clothing that doesn’t last as long as you’d expect. 

If any of these sound familiar, it’s time to consider hard water solutions before the problem escalates.

The Long-Term Impact of Hard Water on Plumbing

Hard water doesn’t just stop at inconvenient spots on your glassware or the frustration of low water pressure—it can seriously harm your plumbing system over time.

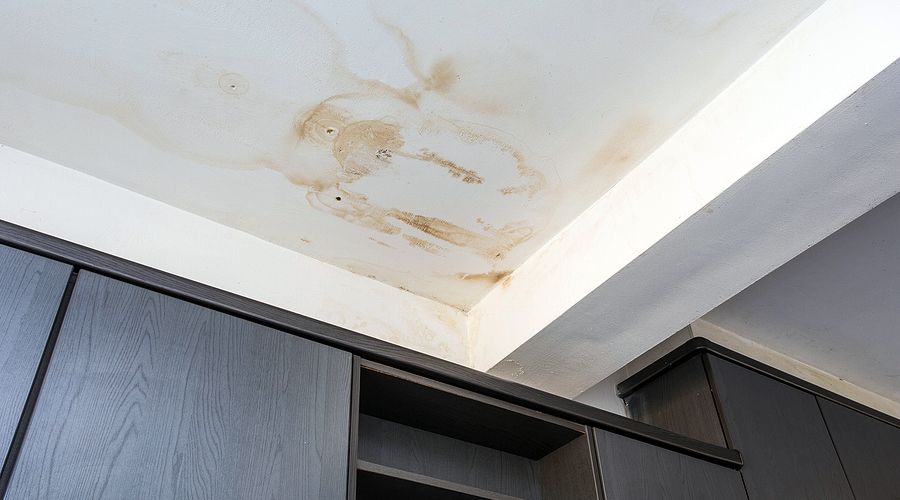
The minerals in hard water gradually settle and solidify inside your pipes, creating limescale buildup. This buildup restricts the flow of water, increasing pressure and forcing your plumbing system to work harder than necessary. Left unchecked, this can lead to clogs, leaks, or even burst pipes.

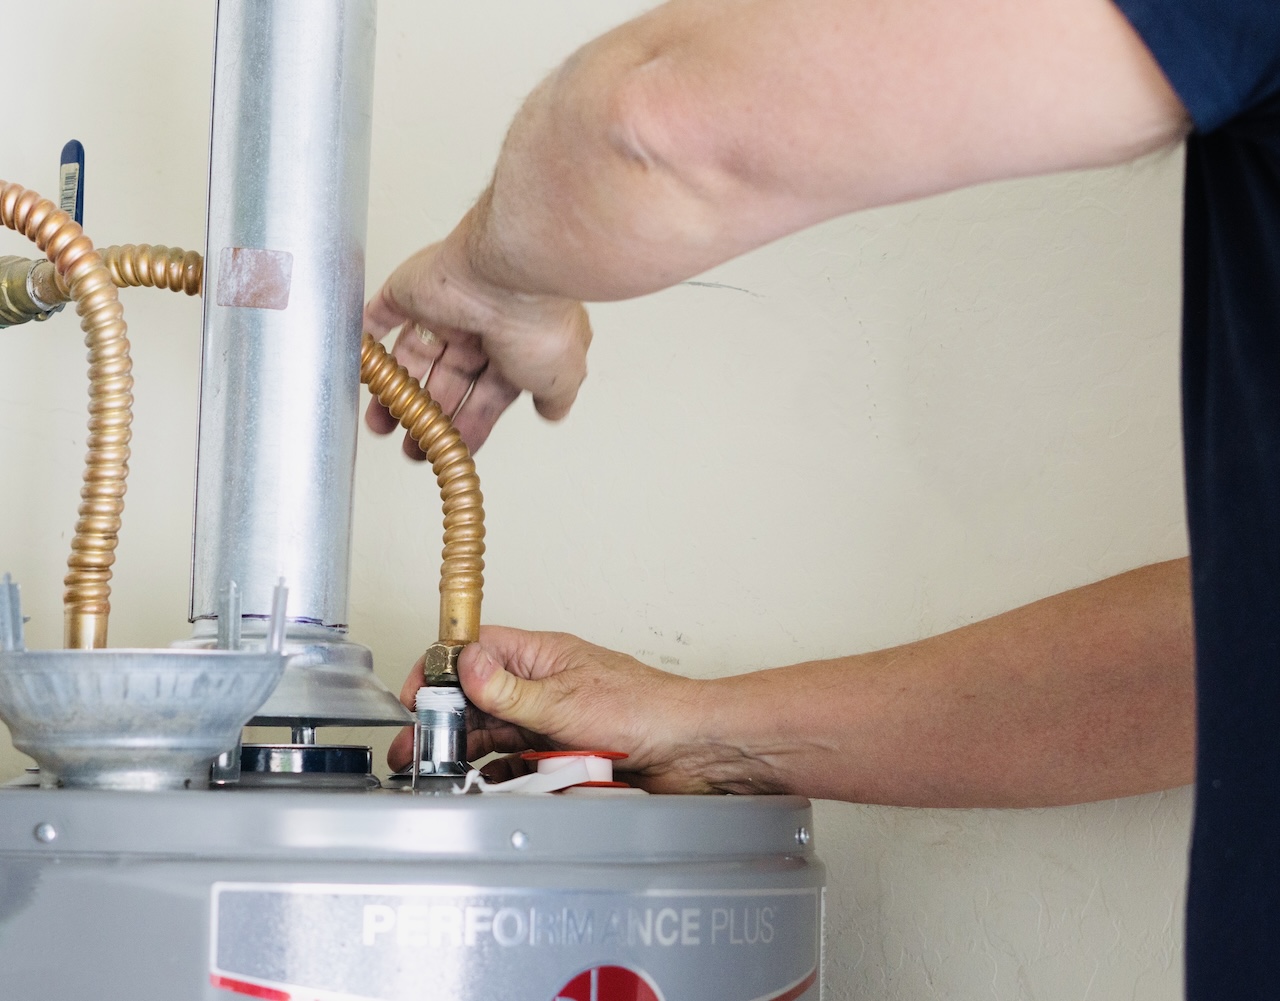
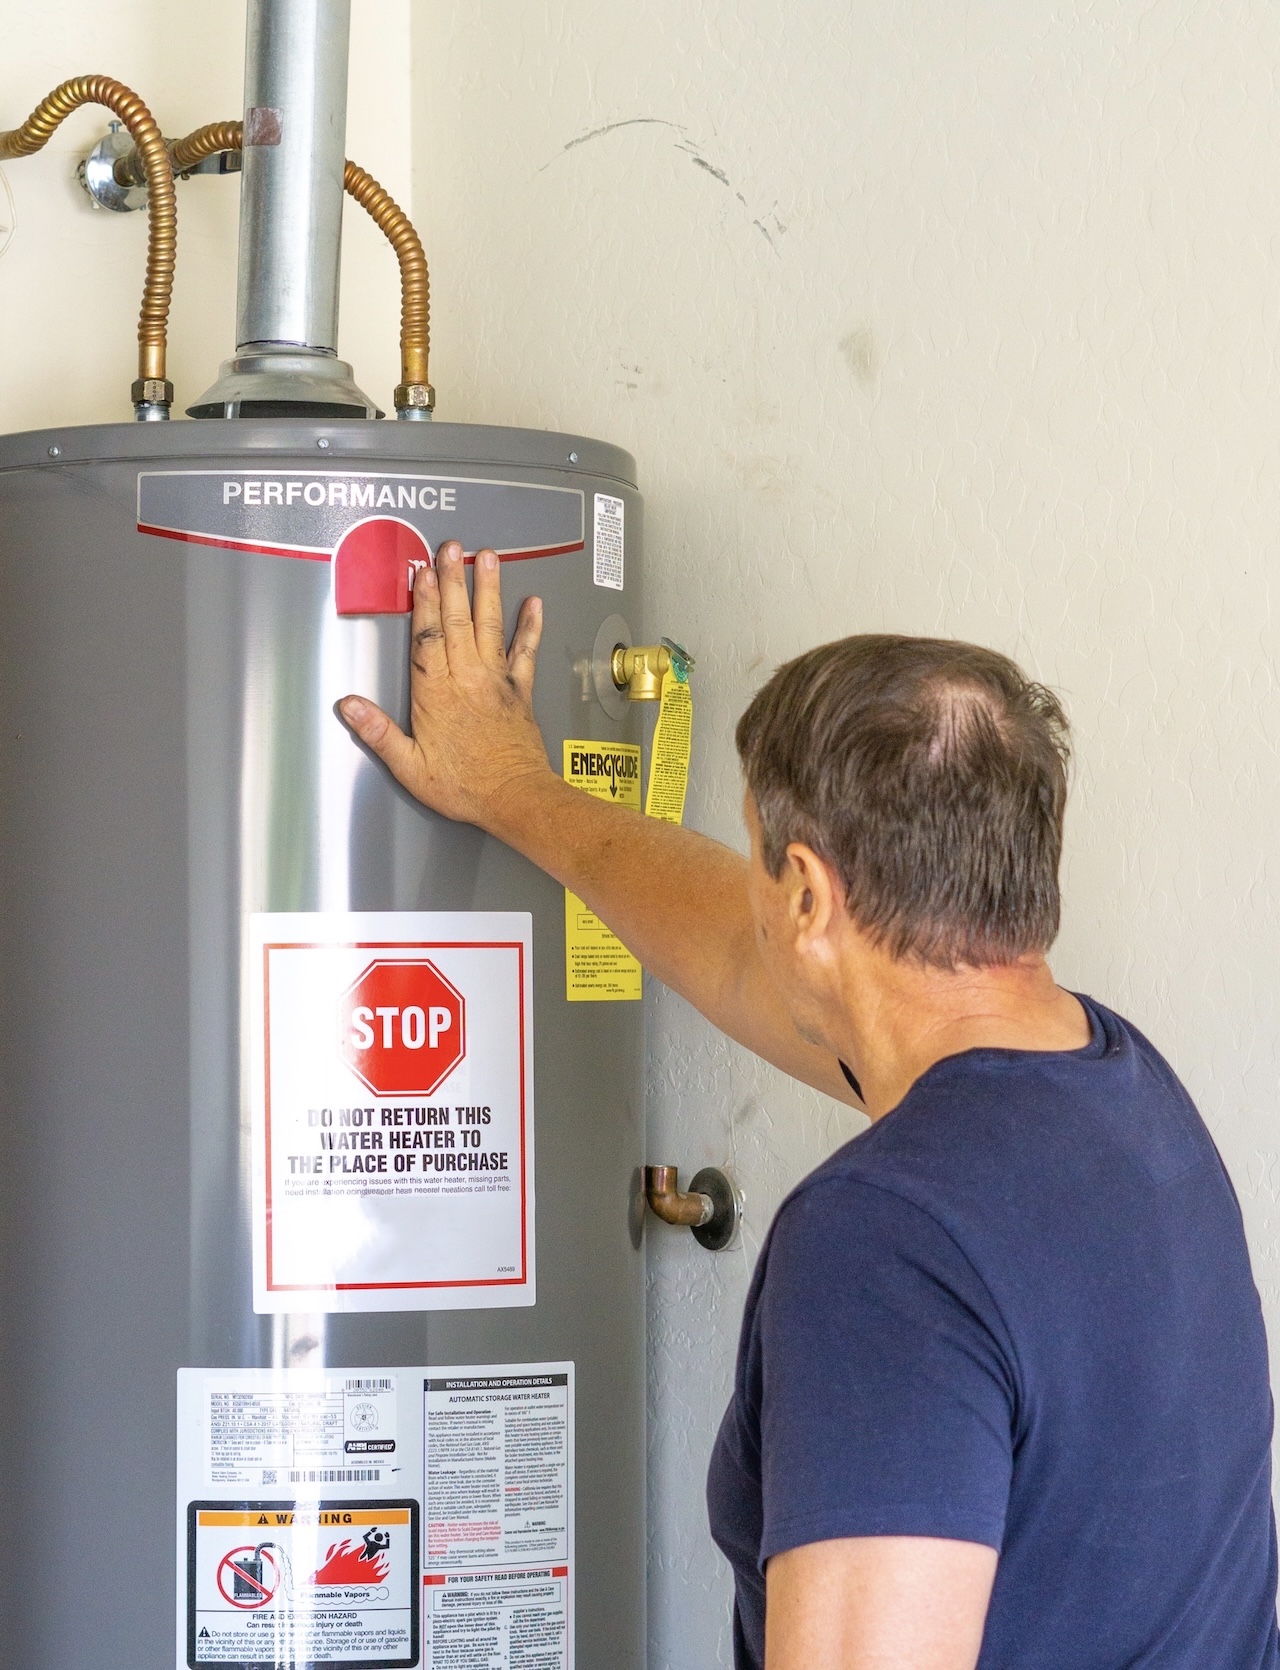
It doesn’t end there. Hard water can also take a toll on household appliances like water heaters, dishwashers, and washing machines. The mineral deposits reduce their efficiency and lifespan, leading to frequent repairs—or costly replacements.

How to Stop Hard Water from Wrecking Your Plumbing

Fortunately, hard water issues aren’t unavoidable. Here are some practical hard water solutions to protect your plumbing and improve your overall water quality.

Install a Water Softener

The most effective defense is to install a water softener. These systems work by removing the calcium and magnesium ions in hard water and replacing them with sodium or potassium ions. This prevents limescale buildup and ensures your plumbing and appliances stay in good condition. If you’re looking for reliable hard water solutions, a water softener is the best long-term fix.

Regular Plumbing Maintenance

Regularly inspecting and maintaining your plumbing system can help prevent hard water damage. This includes descaling faucets, showerheads, and pipes to remove any early-stage limescale buildup. Many homeowners find it helpful to pair routine maintenance with professional plumbing inspections, which can catch hard water issues before they escalate.

Use Water-Conditioning Products

There are various water-conditioning products available that can help minimize the effects of hard water. These include limescale removers and specialized detergents for dishwashers or washing machines that fight mineral buildup. However, these are short-term fixes and aren’t a substitute for a long-term solution like a water softener.

Consider Pipe Replacement for Severe Cases

If hard water damage has already significantly impacted your plumbing system, you may need to replace the damaged pipes. While costly, modern piping materials such as PEX pipes are more resistant to mineral buildup, ensuring fewer issues in the future.

Protect Your Plumbing with Hard Water Solutions

Hard water may seem like a small nuisance at first, but ignoring it can lead to significant problems over time. By recognizing the signs early and taking proactive steps, like installing a water softener or scheduling regular plumbing maintenance, you can save yourself from hefty repair costs and enjoy better water quality.

If you’re ready to protect your home with professional hard water solutions, reach out to Maximum Plumbing for expert services in Florence, KY. From expert water softener installations to reliable plumbing maintenance, we’ll help you keep your plumbing in top-notch condition.

Don’t wait for hard water to wreak havoc on your home—act now!

Don’t Wait Until It Breaks! How Often Do You Really Need a Water Heater Service?

plumber working on water heater maintenance

Your water heater is one of the hardest-working appliances in your home, silently ensuring you have warm showers, clean dishes, and fresh laundry. It’s easy to forget about—until it suddenly stops working.

Regular water heater maintenance is essential to keep your system running efficiently, avoiding unexpected breakdowns, and extending its lifespan. But how often does your water heater actually need service? And what happens if you don’t maintain it? Here’s everything you need to know.

Why Regular Water Heater Maintenance Matters

Proper maintenance does more than just prevent cold showers. It ensures that your water heater operates more efficiently, reducing energy bills. According to the U.S. Department of Energy, water heating accounts for about 18% of a typical home’s energy use, ranking as the second-largest household expense. An inefficient system can significantly increase that percentage.

Regular servicing can help identify any mechanical issues or inefficiencies so you can address them before it becomes a problem—thereby extending the lifespan of your unit, and potentially saving you thousands in early replacement costs.

How Often Should You Service Your Water Heater?

The general rule of thumb for water heater maintenance is annual servicing. However, how often you need maintenance can depend on several factors, including:

  • Water Hardness: If you live in an area with hard water, sediment can accumulate faster, requiring more frequent flushing and maintenance.
  • Water Heater Type: Tankless water heaters tend to need servicing less often than traditional tank models, though they still require periodic descaling to ensure proper function.
  • Usage: A family of five may rely on their water heater far more than a single individual, meaning they may need more frequent servicing.

If you’re unsure, consult your manufacturer’s recommendations or a professional plumber to determine the best maintenance schedule for your specific unit.

Key Maintenance Tasks During a Service

During a professional water heater maintenance appointment, a plumber will typically perform the following:

  1. Flushing the Tank: Removing sediment buildup to improve efficiency and prevent corrosion.
  2. Inspecting the Anode Rod: This metal rod helps prevent rust inside the tank. If it’s deteriorated, it needs to be replaced.
  3. Checking and Adjusting the Temperature: Ensuring the thermostat is set to a safe and efficient level (usually 120°F).
  4. Testing the Pressure Relief Valve: Ensuring the valve can release pressure safely to prevent damage or accidents.
  5. Looking for Leaks or Corrosion: Identifying minor issues before they escalate into costly repairs.

Should You Flush Your Water Heater’s Tank Regularly?

The short answer is yes. Over time, sediment from your water supply can settle at the bottom of your tank—if not removed, this sediment creates a barrier between the burner and the water, making the unit work harder and less efficiently. It can also lead to tank corrosion and leaks.

Flushing your water heater at least once a year can prevent these issues. While it’s possible to flush a water heater yourself, a professional plumber can do it more thoroughly and identify any underlying issues during the process.

What Happens If You Skip Maintenance?

Let’s take a closer look at what can happen if you neglect proper water heater maintenance:

  1. Decreased Efficiency: Sediment buildup forces your water heater to use more energy, driving up utility bills.
  2. Shortened Lifespan: Neglecting maintenance can cause irreversible damage, such as corroded tanks or failing components, leading to premature replacement.
  3. Cold Showers: Without proper care, your water heater may struggle to keep up with demand, leaving you with lukewarm or cold water.
  4. Safety Hazards: Faulty pressure valves or gas leaks pose serious risks, including water damage and even potential explosions.

The Importance of Preventative Maintenance

Preventative water heater maintenance is your best defense against the inconvenience and cost of sudden breakdowns. It’s not just about extending the life of your water heater—it’s about ensuring consistent performance and safety. By addressing minor issues during routine maintenance, you can avoid major repairs down the line.

Simple DIY steps include checking for leaks, listening for unusual noises like rumbling, and adjusting the thermostat if the water temperature needs fixing. However, for in-depth servicing, always rely on a professional plumber. Their expertise ensures every component of your water heater is inspected, cleaned, and tested for optimal performance.

Protect Your Hot Water—Call Maximum Plumbing Today!

Regular water heater maintenance is the key to ensuring a reliable, efficient, and long-lasting system. Don’t wait until you’re left without hot water. Whether you need a full maintenance service or have questions about your water heater, the experts at Maximum Plumbing are here to help.

Call us today to schedule your water heater service and experience the benefits of professional care. Your water heater (and your wallet) will thank you!

Can You Still Shower When the Power Is Out? Here’s What You Need to Know

person taking a shower

Power outages can disrupt daily routines, impacting everything from cooking to staying connected. One common question homeowners face during these moments is, “Can you shower when the power is out?” The answer might be more complex than you expect, depending on your water heating system, water source, and preparedness.

This post will walk you through everything you need to consider to ensure a safe and comfortable experience during a power outage.

Why Power Outages Affect Your Water Supply

When the electricity goes out, it’s easy to assume your water supply will still function as usual. However, this isn’t always the case. While most water systems don’t rely directly on electricity, your ability to take a hot shower depends on several key factors.

  • Water Heater Type – Water heaters, whether gas, electric, or tankless, play a significant role in your ability to access hot water. 
  • Water Source – Homes connected to a city water supply usually maintain pressure during outages, but well systems often rely on electric-powered pumps. 
  • Backup Systems – If you’re using a generator during an outage, it can help power certain systems like water heaters. 

Understanding these nuances is critical to determining whether you can safely shower without power.

Does Your Water Heater Work Without Power?

Your water heater’s functionality during an outage comes down to its type. For example, electric water heaters rely entirely on electricity, obviously making them inoperable during a power outage. However, the hot water already stored in the tank may stay warm for a short time—usually a couple of hours—so act quickly if you want a warm shower.

Gas water heaters generally perform better during outages, as they don’t rely entirely on electricity. However, modern gas heaters with electronic ignition systems may not work without power unless connected to a generator. Tankless options, meanwhile, offer energy efficiency but are unlikely to function when the power is out since they don’t store heated water and require electricity to operate.

Tips for Showering Safely During a Power Outage

When you have no choice but to shower when the power is out, use these tips to stay safe:

  • Check the Water Temperature – Stored water in your heater may retain its heat temporarily. Use your hand to test the water before stepping in to avoid an icy surprise. 
  • Use a Lantern or Flashlight – A dark bathroom can pose safety risks. Avoid showering in complete darkness by placing a lantern, flashlight, or other battery-powered lights to illuminate the area. 
  • Limit Shower Time – Consider conserving unused hot water for others in the household who may need it after you. 
  • Have Backup Supplies Handy – Keep candles, batteries, and other emergency supplies nearby to manage unforeseen challenges. 

By taking these precautions, you can minimize risks and make the best of a less-than-ideal situation.

Preparing for Future Power Outages

The best way to handle power outages is to prepare for them in advance. First, research potential solutions like installing a generator or purchasing backup battery systems for critical appliances like water heaters. Consider investing in alternate heating sources like solar-powered water heaters or wood-burning stoves to serve as backups during outages—plus these options can also help save on energy costs in the long run.

You should also ensure you have an emergency kit stocked with essential supplies such as flashlights, batteries, and bottled water. It’s also helpful to know how to shut off your water supply in case of a major leak or other emergency. With preparation, you can reduce the inconvenience and ensure your home remains functional even without electricity.

Call Maximum Plumbing for Assistance

Still wondering if you can shower when the power is out? Maybe you’re uncertain about your water heater’s power source or need help with emergency shut-off procedures. Whatever the situation, Maximum Plumbing is here to help. Our team of experts can provide advice and assist with any plumbing needs during an outage—and the rest of the time too.

From water heater maintenance to generator installation, we’ll ensure you’re ready for any emergency. Call Maximum Plumbing today and keep your home running smoothly—no matter what.

10 Holiday Foods That Should Never Go Down Your Garbage Disposal

person washes vegetables in a kitchen sink

The holidays are a time for celebration, good food, and quality time with loved ones—but they can also bring about the dreaded kitchen mess. And for many, the garbage disposal becomes the unsung hero of this time of year. But guess what? This handy appliance isn’t indestructible. Overloading it with the wrong types of food can lead to clogs, breakdowns, and an urgent need for garbage disposal repair.

This guide will walk you through what not to put in your garbage disposal, how to prevent mishaps, and what to do if you encounter an issue. Get ready to keep your kitchen running smoothly this holiday season!

Common Garbage Disposal Mistakes

Many homeowners underestimate their garbage disposal’s limitations. It’s easy to assume that this device can handle just about anything you throw its way, but in reality, that couldn’t be further from the truth. Common mistakes that may leave you needing garbage disposal repair include:

  • Overloading the disposal with too much at once.
  • Running the disposal without enough water.
  • Tossing non-food items (hello, utensils) into the mix. 

Foods to Avoid Putting in the Garbage Disposal

Did you know that putting the wrong things down the drain is one of the top causes of plumbing clogs? Here are 10 holiday foods you should never send down the drain to avoid requiring garbage disposal repair:

1. Grease, Oils, and Fats

Though they start as liquids, grease, and oils solidify when they cool, creating stubborn blockages in your pipes.

2. Potato Peels

These can clump together and turn into a starchy paste that wreaks havoc on your disposal blades.

3. Pasta and Rice

These foods expand when exposed to water, forming a gummy mess in the pipes.

4. Turkey or Chicken Bones

Your garbage disposal isn’t designed to handle hard, dense materials like bones. Save these for the trash.

5. Eggshells

Contrary to popular belief, eggshells’ membranes can wrap around the blades and cause damage.

6. Coffee Grounds

Coffee grounds may seem harmless, but they tend to clump together and form sludge over time.

7. Fibrous Vegetables (e.g., Celery, Onion Skins)

The fibers can entangle the disposal’s blades, making it work harder than it should and resulting in the need for premature garbage disposal repair.

8. Nuts

Nuts can turn into the same sticky, pasty consistency as nut butter, which can jam the disposal.

9. Fruit Pits

Items like peach pits, avocado seeds, and cherry stones are far too tough for the disposal to break down.

10. Citrus Peels in Large Quantities

While small amounts can help freshen the disposal, too many thick peels put unnecessary strain on the motor.

By avoiding these items, you’ll significantly reduce the risk of needing garbage disposal repair during your holiday festivities.

If Your Garbage Disposal Stops Working

Even with the best of intentions, things can still go awry. If your garbage disposal suddenly stops working, try these steps:

  1. Turn off the power. Always ensure your safety first—disconnections or resets should only be done when the appliance is fully powered down.
  2. Unclog manually. Use tongs to remove visible blockages; never stick your hand inside the disposal.
  3. Press the reset button. Located at the bottom, this could bring your unit back to life.
  4. Call a professional. If the problem persists, it could be a more complex mechanical issue. Schedule a garbage disposal repair service to get expert help.

Preventative Measures for a Healthy Garbage Disposal

They say an ounce of prevention is worth a pound of cure, and that certainly applies to garbage disposals. Here’s how to keep yours in good shape year-round:

  • Run cold water: Always run cold water during and after using the disposal to help flush food particles away.
  • Feed items gradually: Avoid overwhelming the appliance by feeding it small batches rather than dumping everything in at once.
  • Clean regularly: Use a mixture of baking soda and vinegar monthly to eliminate buildup and blockages.

How to Prevent Garbage Disposal Smells

No one wants a stinky kitchen during the holidays! To keep your garbage disposal fresh:

  1. Clean with citrus. Toss in a few small lemon or lime slices (with the unit running) for a natural deodorizer.
  2. Use baking soda and vinegar. Pour a half-cup of each into the disposal, then flush with hot water after letting it sit for 10 minutes.
  3. Rinse frequently. Ensure there’s plenty of water running to clear debris after every use.

Have a Plumbing Issue? Call Maximum Plumbing!

At the end of the day, even with proper care, your garbage disposal may occasionally need professional attention. Don’t let clogs or failures ruin your celebrations. Whether you’re dealing with a stubborn blockage or a full unit replacement, Maximum Plumbing is here to help.

Contact us today for expert garbage disposal repair, and enjoy the holiday season stress-free!

7 Common Causes of Sump Pump Noise (And How to Solve Them)

A pumping station for a home water heating system

A sump pump is the hero of your basement, tirelessly working to protect your home from water damage during heavy rains or rising groundwater. But when sump pump noise becomes persistent or unusually loud, it’s time to take notice. Excessive noise isn’t just annoying—it could indicate a problem that, if left unchecked, may lead to water damage or even flooding.

Understanding what’s causing the noise can not only save you from sleepless nights but also help you maintain a fully functional pump. This guide will walk you through seven common causes of sump pump noise and, more importantly, how to resolve them.

1. Vibrating Discharge Pipes

If your sump pump’s discharge pipe isn’t properly secured, it can vibrate against walls or floorboards, creating a loud rattling noise.

Solution: 

Use pipe insulation or foam padding to cushion the pipe where it meets other surfaces. Additionally, secure the discharge pipe with brackets or straps to reduce movement.

2. Clogged or Dirty Impeller

The impeller, the rotating part drawing water into the pump, can accumulate debris or sediment. This blockage may cause a grinding noise as the impeller struggles to operate.

Solution: 

Turn off the pump and clean the impeller. Inspect it for any damage and replace it if necessary. Regular maintenance can prevent dirt buildup in the future.

3. Faulty Motor

A squealing or whining noise may be a sign that the sump pump’s motor is malfunctioning, often due to worn bearings or overuse.

Solution: 

If the motor is damaged, it may be time to replace the pump entirely. Always choose a model that matches your home’s needs to avoid overworking the motor.

4. Airlock in the Discharge Line

Airlocks can occur when air gets trapped in the discharge line, leading to loud gurgling or bubbling sounds during operation.

Solution: 

Check if the sump pump’s discharge pipe has a vent hole to prevent airlocks, and unclog it if necessary. If there is no vent, drill a 3/16-inch weep hole below the check valve to release trapped air.

5. Worn Out or Loose Check Valve

A loose or worn check valve—the mechanism that keeps water from flowing back into the sump—can cause a thudding or banging noise known as “water hammer.”

Solution: 

Inspect the check valve and ensure it’s tightly secured. If it’s worn, replace it with a spring-loaded valve to eliminate the sudden slamming noise.

6. Poorly Aligned Pump

An improperly seated sump pump can wobble during operation, creating excessive vibration and noise.

Solution: 

Check that the sump pump is positioned upright and firmly on the basin floor. If necessary, adjust its position or add a rubber mat underneath to absorb vibration.

7. Old or Overworked Pump

Sump pumps have a lifespan of around 7–10 years. If yours is making frequent noises despite troubleshooting, it may have reached the end of its life.

Solution: 

Upgrade to a newer, energy-efficient model with quieter operation. Consider consulting a professional plumber to help you select the right sump pump for your home.

Preventing Sump Pump Noise

Prevention is always better (and quieter) than repair. Here are some simple ways to keep sump pump noise under control:

  • Inspect and Clean Regularly: Check for debris in the basin and impeller.
  • Secure All Components: Stabilize discharge pipes and ensure the pump is correctly seated.
  • Replace Parts as Needed: Worn-out check valves, bearings, or seals should be swapped out promptly.
  • Schedule Professional Maintenance: A routine check by a plumber can catch and fix minor issues before they become noisy problems.

Don’t Let Sump Pump Noise Get You Down

Sump pumps play a critical role in protecting your home from costly water damage. According to FEMA, over 98% of basements in the U.S. will experience some form of water damage during their lifetime. Ignoring sump pump noise now could lead to equipment failure later, putting your home at risk.

If your sump pump isn’t performing at its best or you’re unsure how to tackle persistent noise, our team at Maximum Plumbing is here to help. We specialize in diagnosing and fixing sump pump issues to ensure your home stays safe and dry.

Contact Maximum Plumbing today to schedule a professional inspection. We’ll make sure your sump pump is running smoothly—so you can enjoy a quieter and worry-free home.

10 Simple Tips to Prevent Clogged Toilets in Your Office

Workplace bathroom sink

We’ve all been there—frustrated by an out-of-order sign on the office restroom door just when nature calls. A clogged toilet may seem like a minor inconvenience, but in a busy workplace, it can quickly escalate into an unsightly and expensive problem without a quick plumbing solution.

Fortunately, keeping your office toilets flowing smoothly isn’t an impossible goal. By adopting a few simple habits and precautionary measures, you can save on repair costs and ensure your restrooms remain sanitary and accessible to all employees.

Here are 10 practical tips to help prevent clogged toilets in your office.

1. Post Signage for Proper Disposal

One of the easiest ways to prevent clogged toilets is to post signs reminding everyone to flush only toilet paper and human waste. Items like paper towels, sanitary products, and wipes (even if they’re labeled “flushable”) don’t break down as easily as toilet paper, leading to blockages.

Consider including multilingual signs or universal symbols to ensure everyone understands the message, regardless of language preference.

2. Provide Trash Bins in Every Stall

To discourage improper flushing, make sure there are accessible trash bins in every restroom stall. This provides a convenient alternative for disposing of non-flushable items.

Ensure the bins are emptied regularly to maintain a clean and hygienic restroom environment. It’s a small investment that can lead to significant savings on plumbing repairs over time.

3. Avoid Flushing Excessive Toilet Paper

Using more toilet paper than necessary can contribute to clogs. Encourage employees to use only as much as needed and to flush more frequently if necessary to prevent buildup.

You can communicate this message through signage or a quick reminder during staff meetings. It’s all about creating a culture of awareness to keep things flowing smoothly.

4. Conduct Regular Plumbing Maintenance

Routine plumbing maintenance is crucial to preventing clogged toilets and other restroom woes, helping to identify and address any minor issues before they escalate into major problems.

According to the Environmental Protection Agency, minor leaks waste more than 1 trillion gallons of water annually in the U.S. alone. Regular maintenance can catch these leaks early, conserving water and saving on utility bills while making sure your toilet is never clogged.

5. Keep Restrooms Stocked with Proper Supplies

Keep restrooms stocked with high-quality toilet paper that breaks down easily and avoid products that are too thick.

Ensure that other necessary items, such as hand towels and garbage cans, are readily available, so employees don’t resort to using alternatives that might end up in the toilet.

6. Respond Quickly to Minor Clogs

When a clogged toilet does occur, it’s essential to address it promptly to prevent further complications. Ensure that maintenance staff are trained to handle minor clogs with basic tools like plungers and augers.

For more stubborn issues, it may be necessary to call a professional plumber to prevent further damage or backups.

7. Encourage a Culture of Responsibility

Fostering a culture of responsibility among employees can go a long way in maintaining restroom functionality. Encourage everyone to be mindful of their restroom habits and to report any issues promptly.

Engaging employees in a conversation about restroom responsibilities can lead to more consistent adherence to best practices.

8. Implement Automatic Flush Systems

Automatic flush systems can help manage restroom hygiene and prevent clogged toilets by ensuring that waste is flushed effectively after each use. These systems reduce the likelihood of waste buildup and can save water by controlling flush volume.

While the initial investment may be higher, the long-term benefits in terms of reduced maintenance and clog prevention make it a worthwhile consideration.

9. Implement a Regular Cleaning Schedule

Maintaining a regular cleaning schedule for restrooms not only keeps them hygienic and pleasant to use but also helps identify any potential issues that could lead to clogs.

Make sure the cleaning staff are trained to spot common signs of clogged toilets, such as slow flushing or unusual noises.

10. Call in the Experts When Needed

Despite best efforts, there may be times when professional help is necessary. If you encounter persistent or severe restroom issues, don’t hesitate to call a licensed plumber.

Maximum Plumbing offers expert services to address plumbing challenges, ensuring your office toilets remain clog-free and functional.

Flush Away Your Worries with Maximum Plumbing

A well-maintained restroom is essential for any office environment. By implementing these 10 simple tips, you can prevent clogged toilets, reduce maintenance costs, and maintain a sanitary space for everyone.

For plumbing issues that require professional attention, contact Maximum Plumbing to ensure your workplace remains in top condition. Give us a call to learn more about our expert services and how we can assist you in maintaining a clog-free environment.

Don’t Get Left in the Cold: How to Protect Your Plumbing This Winter

Icicles hanging on a line

Winter can be harsh, not just for us but for our homes too. One of the most overlooked yet crucial aspects of winter preparedness is plumbing. Did you know that a single burst pipe can cost homeowners upwards of $5,000 in repairs? That’s why frozen pipe prevention should be on your to-do list as the temperatures drop.

In this post, we’ll guide you through some essential tips to winterize your plumbing and keep your home cozy and dry this season.

Frozen Pipe Prevention Tips

When water freezes inside your pipes, it expands, causing pipes to crack or burst. These damages can lead to extensive repairs and increase water bills, making frozen pipe prevention essential to maintaining your peace of mind during the chilly months. Here are our top tips to try this winter to keep your plumbing running smoothly:

Insulate Exposed Pipes

One effective method is insulating exposed pipes to reduce the likelihood of freezing and bursting. Pipes located in unheated areas like basements, attics, or garages are particularly vulnerable. You can use foam pipe insulation or heat tape to keep them warm. This simple step can save you from major plumbing headaches and hefty repair bills.

Allow Faucets to Drip on Cold Nights

Another smart frozen pipe prevention tactic is to allow your faucets to drip during extremely cold nights. This practice keeps water moving through the pipes, reducing the chances of freezing. It’s a small trick that can make a huge difference, especially if you live in an area prone to freezing temperatures. Just a gentle drip can prevent pressure buildup and protect your plumbing system.

Disconnect and Drain Outdoor Hoses

Don’t forget about your outdoor hoses and faucets—they need winter protection too. Start by disconnecting all outdoor hoses and unhooking hose bibs. Then, drain any remaining water from the hoses and store them indoors. This step is crucial because residual water can freeze and expand, damaging the hoses and causing cracks in connecting pipes.

Keep Your Home Warm

Maintaining a warm indoor temperature plays a significant role in frozen pipe prevention. Even if you go out of town, keep your thermostat set to at least 55°F. This ensures the warmth extends to areas where water pipes are located. Additionally, you can open cabinet doors in your kitchen and bathroom to allow warm air to circulate around the plumbing, which can help prevent freezing.

Monitor Weather Forecasts

Staying informed about the weather helps you stay prepared. Keep an eye on the forecast, especially during peak winter months. If you expect a sudden drop in temperature, take extra precautions to protect your plumbing. Knowing in advance allows you to implement these preventive measures and safeguard your home from potential plumbing disasters.

Know When to Call a Professional

While many frozen pipe prevention strategies are DIY-friendly, some situations require professional expertise. If you notice reduced water flow, visible frost on pipes, or suspect a leak, it’s time to call in the experts. A professional plumber can assess the situation and provide the necessary repairs, ensuring your home’s plumbing remains in top shape throughout the winter.

Invest in Plumbing Upgrades

If your home is prone to plumbing issues during the winter, consider investing in upgrades. Modern plumbing systems are designed with materials that offer better insulation and durability. Replacing old pipes with new, high-quality materials can provide long-term protection against freezing temperatures. Consult with a professional plumber to discuss potential upgrades.

Prioritize Pipe Protection This Winter with Maximum Plumbing

When it comes to winterizing your home, frozen pipe prevention should be a top priority. By taking these proactive steps, you can protect your plumbing and avoid costly repairs. For expert advice and assistance, reach out to Maximum Plumbing, your reliable partner in maintaining a safe and efficient plumbing system all year round.

So don’t get left in the cold this winter—make your pipes a priority this winter to protect your home and your wallet.

The Ultimate Guide to Clearing Those Stubborn Clogged Drains

clogged drain repair

Nothing disrupts the house like a stubborn clogged drain. It’s an inconvenience that can escalate into a nightmare if not addressed promptly. But don’t panic—with the right techniques and preventive measures, you can tackle these pesky blockages head-on. Let’s unravel how to deal with a clogged drain and ensure your plumbing flows smoothly.

Common Causes of Drain Blockages

First, let’s look at what typically causes these blockages. Recognizing these culprits is your first step toward effective prevention and maintenance:

  • Accumulation of hair and soap scum in bathroom drains
  • Food particles and grease buildup in kitchen sinks
  • Flushing non-biodegradable items down the toilet
  • Mineral buildup in older plumbing systems

Ways to Clear a Clogged Drain

Here are some tried and tested methods to help you get rid of a drain blockage:

Boiling Water Method

The simplest method begins with boiling water. Carefully pour it down the drain in two to three stages, allowing the hot water to work its magic between pours. This method is ideal for loosening minor grease and soap scum buildup. Be cautious with PVC pipes, as excessive heat can cause damage.

Boiling water is a great first attempt due to its simplicity and zero cost. It’s especially effective for metal pipes and initial clogs. If it doesn’t completely clear the clog, it may at least reduce it enough for other methods to work better.

Baking Soda and Vinegar Solution

This classic combination is not just for science experiments—it’s a proven home remedy for clogged drains. Start by pouring half a cup of baking soda into the drain, followed by an equal amount of vinegar. Cover the drain immediately to prevent the fizz from escaping.

Allow the mixture to sit for at least 15 minutes. The chemical reaction will help break down the gunk causing the blockage. Flush the drain with boiling water to finish the job. This eco-friendly method not only clears clogs but also deodorizes your drains.

Using a Plunger

A trusty plunger can be your best ally when dealing with a stubborn clogged drain. Choose a plunger that fits the size and shape of your drain. For sinks, ensure the plunger forms a tight seal around the drain opening.

Fill the sink with enough water to cover the plunger’s cup, then plunge vigorously for 20 seconds. The pressure created helps dislodge stubborn clogs, allowing water to flow freely. Repeat as necessary, ensuring you maintain a good seal and steady rhythm.

Drain Snake or Plumbing Auger

For clogs that resist simpler methods, a drain snake or plumbing auger is your next line of defense. These tools are designed to reach deep into pipes, grabbing or breaking up blockages that lurk beyond arm’s reach. Drain snakes are particularly effective for hair and solid debris, making them a staple for bathroom maintenance.

Insert the snake into the clogged drain, turning the handle clockwise. Push gently until you feel resistance, indicating contact with the clog. Continue twisting to break up the blockage, then retract the snake slowly.

Dish Soap and Hot Water

For kitchen sinks facing grease-related clogs, combine dish soap and hot water. Squirt a generous amount of grease-fighting dish soap into the drain, and follow with a pot of boiling water. The soap helps to dissolve grease, while the hot water flushes it away.

This method is quick, simple, and perfect for kitchens, where grease buildup is a frequent problem. Regular treatment with dish soap and hot water can prevent grease from accumulating to problematic levels.

Call a Plumber for Stubborn or Recurring Clogs

Sometimes, despite your best efforts, a clogged drain needs the touch of a professional. If frequent clogs, slow drainage, or unpleasant odors persist, you may be dealing with a larger issue within your plumbing system. Tree roots, broken pipes, or deep-seated blockages might require professional intervention.

Professional plumbers have the tools and expertise to diagnose and resolve complex plumbing problems, ensuring long-term solutions. Their advanced equipment can identify issues that are invisible to the naked eye, preventing costly damage down the line. Plus, enlisting a professional ensures peace of mind, knowing your plumbing is in expert hands.

Tips for Preventing Future Clogs

Prevention is always better than cure. Here are some tips to keep your drains clear and functioning:

  • Avoid pouring grease or coffee grounds down the sink.
  • Use drain guards to catch hair in showers and tubs.
  • Run hot water through kitchen drains regularly.
  • Schedule annual professional drain cleaning to maintain optimal flow.
  • Educate family members on what shouldn’t be flushed or washed down drains.

Call Maximum Plumbing for Expert Drain Cleaning

Clearing a clogged drain can be a straightforward task if you understand the causes and know the right methods. Regular maintenance and mindful habits play crucial roles in preventing future issues.

If you’re dealing with persistent clogs or serious plumbing problems, remember that Maximum Plumbing is just a call away. With our expertise, you can ensure your drainage system remains in top-notch condition. Give us a call anytime you need us!


Help, I’ve Got No Hot Water! What to Do When Your Water Heater Stops Working

water heater repair

Few things can disrupt your day quite like turning a handle to discover your water heater is not working. For everything from a morning shower to washing dishes, hot water is an essential part of our daily routine. When it stops flowing, quick action is necessary to prevent inconvenience and further complications.

This guide will help you understand potential causes, immediate steps you can take, and when to call in the experts for water heater repair.

The Importance of a Quick Response

Of course, a lack of hot water can significantly impact daily tasks and activities. From personal hygiene to cleaning and cooking, delaying repairs can lead to inconvenience and disruption in our routine. A malfunctioning water heater doesn’t just mean cold showers—if left unchecked, it can lead to more significant and costly problems down the line.

A small leak or malfunctioning component can quickly escalate into a major repair or even replacement of the entire unit, along with being a potential safety hazard, leading to risks such as scalding or electrical fires. Plus, malfunctioning water heaters can lead to energy waste and a higher utility bill—when water heating is already one of the largest household energy expenses.

Potential Causes of a Water Heater Not Working

When you find your water heater not working, several factors could be at play:

  • Power Supply Issues: Electric water heaters rely on a stable power supply. A tripped breaker or a blown fuse can stop the heater from functioning.
  • Gas Supply Problems: For gas water heaters, ensure the gas valve is open and the pilot light is lit. Any disruption in the gas supply can halt the heater function.
  • Thermostat Malfunctions: Incorrect thermostat settings or a malfunction can prevent the heater from reaching the desired temperature.
  • Leaking Water Heater: Puddles around the heater might indicate leaks, which require immediate attention to prevent water damage and ensure efficiency.

Immediate Steps to Take When Your Water Heater Stops Working

When faced with a water heater not working, here’s a checklist to help you troubleshoot what kind of water heater repair might be needed:

Check the Water Heater Power Supply

First, verify that your water heater is receiving power. For electric heaters, check the circuit breaker and ensure it hasn’t tripped. Reset it if necessary. For gas models, confirm that the gas supply is on and the pilot light is lit.

Inspect the Thermostat and Settings

Look at your water heater’s thermostat. Make sure it’s set to the appropriate temperature—typically between 120°F and 140°F. Adjust if needed and monitor for changes.

Examine for Visible Leaks

Inspect the area around the water heater for any signs of leakage. Leaks can indicate an internal problem that needs prompt attention. If a leak is found, turn off the water supply and power to the unit immediately.

Test the Pressure Relief Valve

The pressure relief valve helps maintain safe pressure levels within the tank. Lift the valve’s lever to ensure it functions correctly, allowing a burst of hot water to escape. If no water flows or only a trickle escapes, the valve may need replacing. Be aware that testing an older water heater’s valve may cause it not to seal properly afterward, potentially requiring replacement.

Basic Troubleshooting for Your Water Heater

Before calling in a professional, you can try these basic troubleshooting tips when your water heater’s not working:

  • Reset the Water Heater: Locate the reset button on your electric water heater, typically found on the thermostat. Pressing it may resolve minor glitches.
  • Flush the Tank: Sediment buildup can reduce heater efficiency. Flushing your tank regularly can improve performance and prolong its lifespan. Consult your manual for instructions.
  • Check the Anode Rod: This component prevents rusting inside the tank. If it’s corroded, replacing it can help maintain your heater’s operation.

When to Call a Professional

If your attempts at troubleshooting don’t resolve the issue, or you run into something you don’t recognize, it’s time to contact a professional for water heater repair. Persistent problems, strange noises, or significant leaks require expert attention. Professionals can ensure safety and effective repair, minimizing the risk of further damage.

Tips for Preventing Future Water Heater Issues

Prevention is key to avoiding future problems with your water heater. Regular maintenance can keep your system running smoothly. Here are some tips:

  • Schedule Annual Inspections: A professional inspection once a year can catch potential issues before they escalate into major problems.
  • Regularly Flush the Tank: Every six months, flush your water heater to remove sediment buildup and improve efficiency.
  • Monitor for Leaks: Keep an eye out for any signs of leaks and address them promptly to prevent water damage.

Turn to Maximum Plumbing for Heater Repair

A water heater not working can be a source of frustration, but knowing how to respond can turn a potential crisis into a manageable situation. Remember, regular maintenance and timely repairs are vital for keeping your water heater in top condition.

If issues persist, don’t hesitate to reach out to professionals for water heater repair. For reliable and expert solutions, contact Maximum Plumbing today—your comfort is our priority.


How Can Homeowners Identify Water Leaks?

water leak

Tips to Catch Leaks Before More Water Damage and High Water Bills Can Occur

Water leaks can cause several problems for households, so it’s important to catch them and call for water leak detection and repair services as soon as possible in order to prevent water damage and avoid wasting more money on water costs. This post will provide tips on how homeowners can quickly identify water leaks. 

Signs of a Water Leak

Homeowners should be aware of common signs of a water leak so they can be alerted to a leak in their homes. The faster these are detected, the sooner a plumber can perform water leak repair. Here are some common signs of a leak:

  • Water stains: Water stains or discoloration on ceilings, walls, or floors can signal a leak.
  • Peeling paint or wallpaper: Moisture buildup from a leak can cause paint or wallpaper on the walls to peel or bubble.
  • Damaged floors: Water damage from a leak can lead to cracks or damage to the flooring. 
  • Mold growth: Mold thrives in damp environments, so mold and mildew growth can indicate a leak.
  • Sounds of running water: When no taps or appliances are turned on, dripping or running water sounds could indicate a leak.
  • Reduced water pressure: Unexplained drops in water pressure from the plumbing fixtures can indicate a leak.

High Water Bills

bills Another important sign for homeowners to be aware of that indicates a household has a water leak is higher than normal water bills. If water costs have increased without a noticeable change in the household’s water usage, it can indicate that water is being wasted from a leak. 

Homeowners should call a plumber as soon as they notice high water bills or other signs of a water leak so they can detect and repair the leak as soon as possible. Early detection and repair can prevent extensive water damage and repairs to fix the water damage, as well as lower the water bill.

Use the Water Meter

water meter Homeowners can also use their water meters to determine if the house has a water leak. Some water meters have a leak indicator, making it easy to determine whether there is a leak when the house isn’t using any water. However, even without this leak indicator dial, a water meter can still be used to find a leak. 

First, homeowners must be sure that nothing inside or outside the house is using any water. Then, they should take note of the reading on the water meter. After waiting for a period where no water is used during that time, they should recheck the reading. If the water meter has continued running when no water was used, it can indicate a water leak. 

About Maximum Plumbing

Maximum Plumbing is a commercial and residential plumbing company serving the Florence area. They provide straightforward pricing, the latest technology, and a beneficial membership program. Call them for water leak detection and repair in Florence, KY